Change TMP colours on Snappyrom
I like using Turbo Macro Pro (TMP) on the C64. The installer disk has a little utility that lets you change the colours of the editor screen to any of your choosing. I like setting my colours too.
Snappyrom has TMP built in to the cartridge and although you might not think loading from disk is too bad (which it isn't), loading instantly from cartridge is even better!
My only minor niggle with the Snappyrom version is that the colours are set to default and while there's nothing wrong with them, I'd prefer to use my colours if possible. You can change them within the software but you have to either save the preferences to a disk or set them every time you boot. Neither option appeals to me.
This should be pretty straight forward. The quickest way to find which bytes need changing is to open up my customised TMP version in a hex editor and compare it against the vanilla version on the TMP disk.
I used C64 Dirmaster to extract the files from the floppy images and then opened them in HxD. From the Analysis toolbar, I ran a compare which showed me three differences.
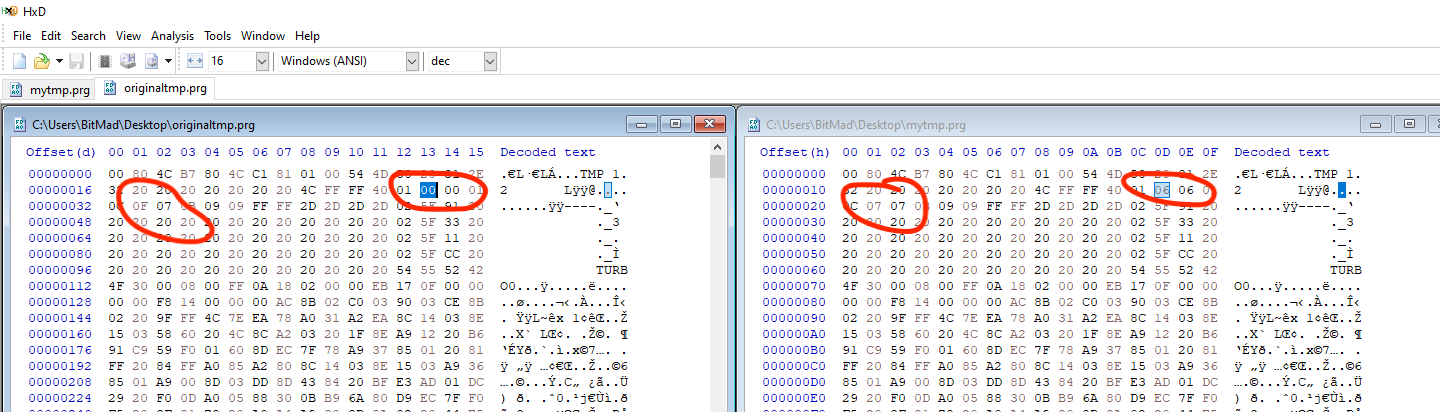
These must be the options I set initially which I think were background, border and text colour.
The colours I opted for initially were yellow text on a blue background. This may lead you to think I'm an Amstrad CPC fan or that I'm exercising my political views.... neither would be correct. I went to college in the 90s and we used Borland Turbo C. It had yellow on blue and I found it comfortable to use so why not stick with it eh?
Now I'll open up the snappyrom file in the hex editor and do a quick search for "TMP 1.2" as that text string was near the bytes we're looking to change. That brings me to where I need to be and now I can change the bytes accordingly. I've chosen to stick with the same colours but it's easy to pick your own.
This is the point where I wanted to insert a screenshot to show the changes but it seems to have walked off. I may re-take it later but honestly it's just like the one above....
With that done, it's time to save the changes to a new file and boot the cart up to see if it worked.
I had the MiSTer next to me so chose that for testing and I am very happy to say that it worked perfectly.
I'm really happy with the results and this will be my go-to cartridge version from now on.
You can download a copy of my modified version here if you wish or you could go out and do your own custom version.